


Spinner mount
Propeller Spiner CM-92 for YAK-18T, YAK-50, YAK-52 Aircraft Mounting Instruction
Aicraft spinner consist of fiberglass shell and several duraluminium parts, comprising spinner mainframe. Spinner structure is simple and easy for assembling and disassembling, no special tooling is required. Please follow the instructions below and refer to Fig. 1 and Fig. 2 to complete the task seccessfully.
Before mounting the spinner you must first remove and discard two parts: the skull-cap and the inner ring of the cooling gills.
Skull-cap and gills inner ring removal
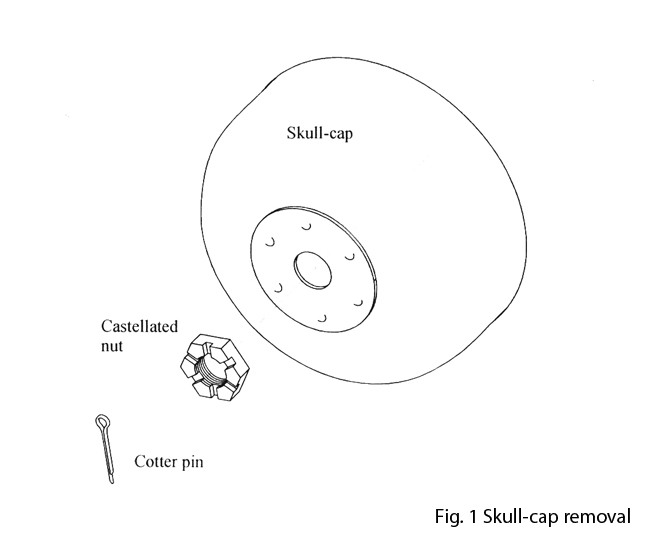
- Remove the cotter pin (refer to Fig.1 ).
- Unscrew the castellated nut, securing the skull-cap.
- Remove and discard the skull-cap. From now it will not participate in your aircraft's further activities.
- Carefully unbend the ends of locking washers and unscrew 6 nuts securing the propeller ( refer to Fig. 2 ).
- Call your mother-in-law to help you in removing the propeller and putting it on the workbench or other safe place.
- From now you have a good access to remove screws securing the cooling gills inner ring and the inner ring itself. Put it together with the skull-cap.
Spinner mounting
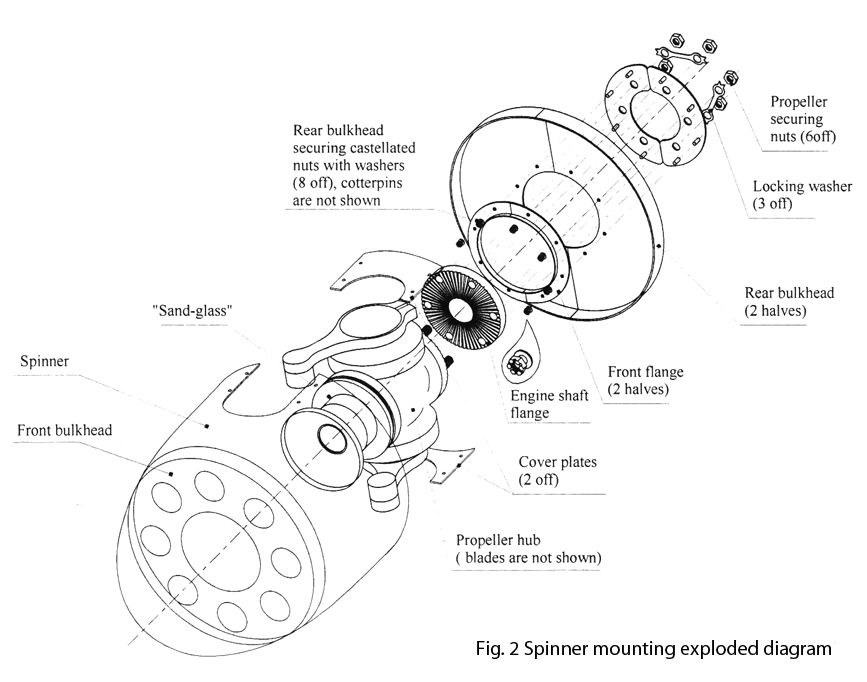
Refer the exploded diagram on Fig. 2 which will help to realize the whole assembly. Don't allow your mother-in-law to go too far as you will need her while reinstaling the propeller.
- Put the spinner on soft surfacein order not to scratch its painting.
- Remove all screws around the rear of the spinner securing the rear bulkhead ( they are not shown in the Fig. 2 for clarity ). Also remove both cover plates. All the spinner parts are enumerated in order not to mix them up thus causing spinner disbalance.
- Reinstall the propeller and release at last old lady.
- Install the two halves of the rear bulkhead together with the front and rear flanges from the rear side of the engine shaft flange with their 6 holes on the propeller fitting studs.
- Reinstall 3 locking washers and 6 propeller securing nuts. This place became extremely awkward. To make your life a bit easier you may use a loop made of locking wire. Put a nut in this loop, slightly twist the ends of the loop in order the nut to sit firmly.Using this tooling make the nut to grasp the thread of a propeller fitting stud, then remove the loop. Repeat this procedure for other 5 nuts. Tighten all nuts with a wrench.
- Bend the ends of locking washers on the nut edges.
- Fasten the rear bulkhead's halves with the front and rear flanges using 8 castellated nuts with washers under them.
- Lock all nuts using 8 cotter pins.
- Install the "sand-glass" in the propeller hub. Make sure its end with the bonded gum strip points forward.
- Secure it with the big castellated nut left from the skull-cap. Lock the nut with a corresponding cotter pin.
- Carefully slide the spinner shell on. The big hole in the front bulkhead must rest on the gum strip of the "sand-glass" and the rear edge of the spinner goes on the rear bulkhead's boom.
- Install two cover plates, then secure the spinner using its screws and screw in two additional screws for each cover plate.
- Let your mother-in-law make sure she can be proud of you and tell you can take her in the first flight with a new spinner.
 |
 |
For more information please visit contacts page and contact us